
Getting Started
Congratulations!
You’re the proud owner of a new ErgoDox EZ. Thank you for picking our keyboard! If you’ve only ever used traditional keyboards, this tool can seem a bit intimidating, but don’t worry: This guide will take you through everything you need to start your journey towards a more ergonomic writing experience.
Remember, this is a journey — a typing adventure if you will. You’ve been typing with staggered, old-style keyboards for years; you’ll quickly notice your bad habits when starting with an ErgoDox EZ. Don’t fret: With this guide and practice, you’ll be able to regain your typing speed and enjoy a keyboard that’s perfectly customized for your individual needs. Soon you’ll be left wondering why ErgoDox EZ is not the standard layout!
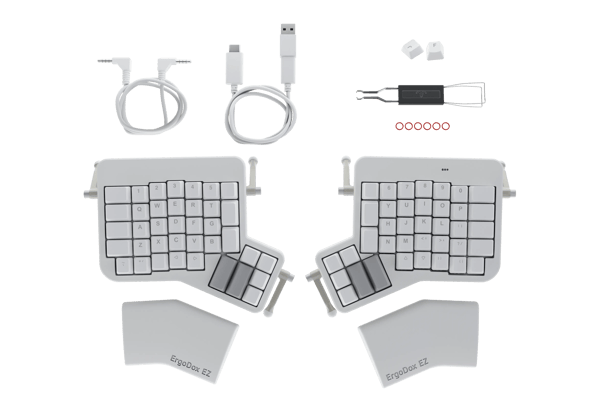
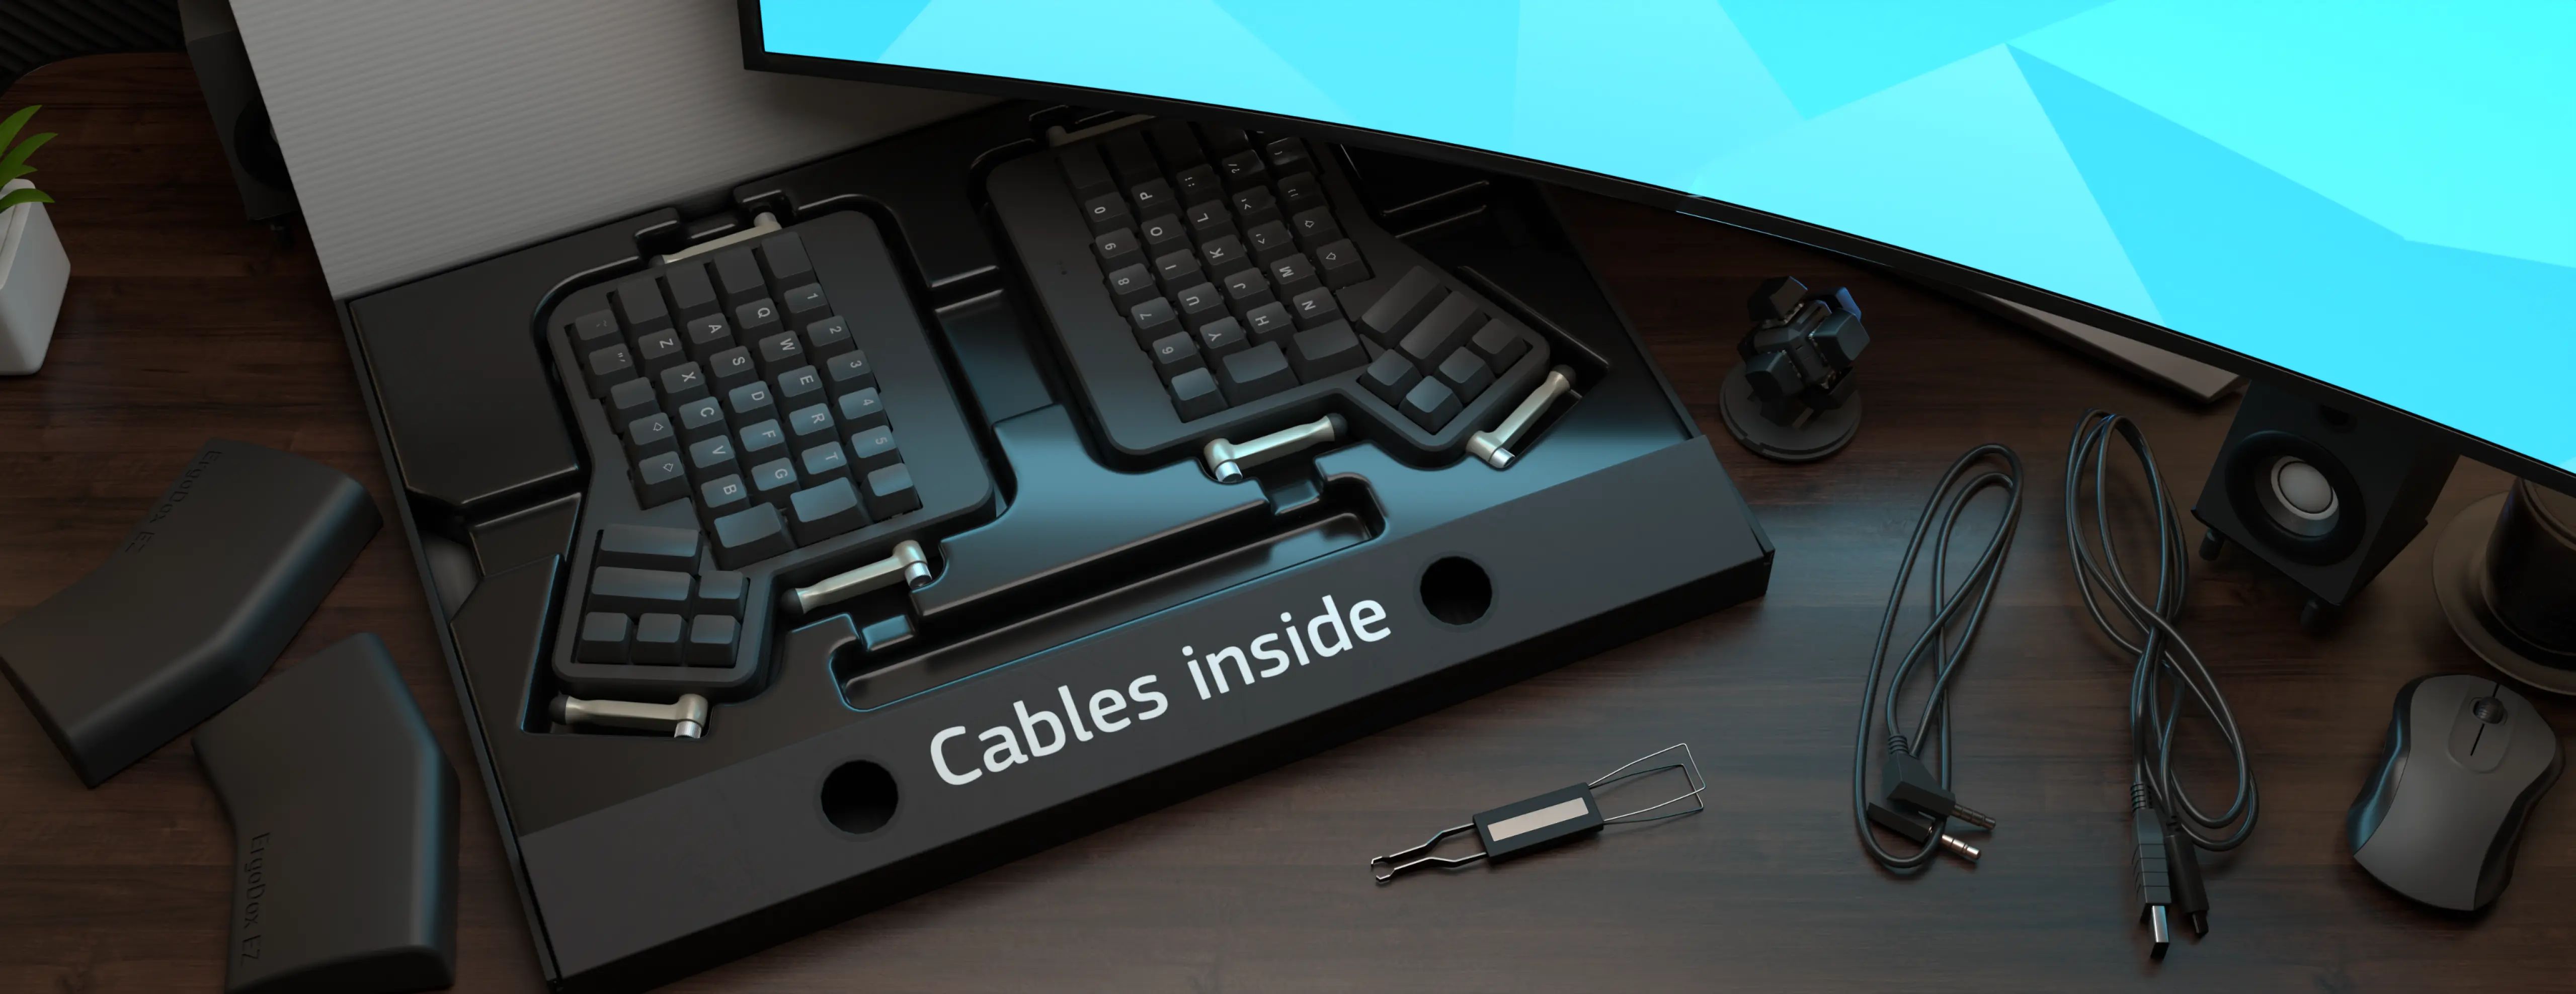
What’s in the box
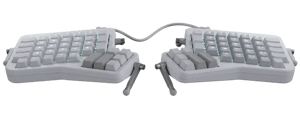
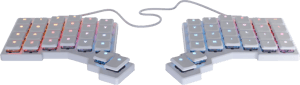
- Keyboard: (2 halves).
- 3.5mm TRRS cable: this connects the two halves of your keyboard. TRRS stands for tip-ring-ring-sleeve (the connector type) and can be replaced with any other TRRS cable if you want to customize or extend it.
- A USB Type C cable with a Type A dongle: this connects the keyboard to your computer.
- Key puller: Use it to remove keycaps and keyswitches, to customize your board over time.
- Extra keycaps: If you ordered the printed keycaps, you will also receive two loose F and J keys with no tactile nubs on them, which you can replace your existing F and J keys with, in case you want to use a layout such as Colemak in which there is no reason to have nubs on F and J (since they're not in the home row).
- Six small red washers: These can be inserted between the tilt/tent leg and the keyboard, to disable the positive stops (the clicks at specific angles) and allow infinite adjustability.
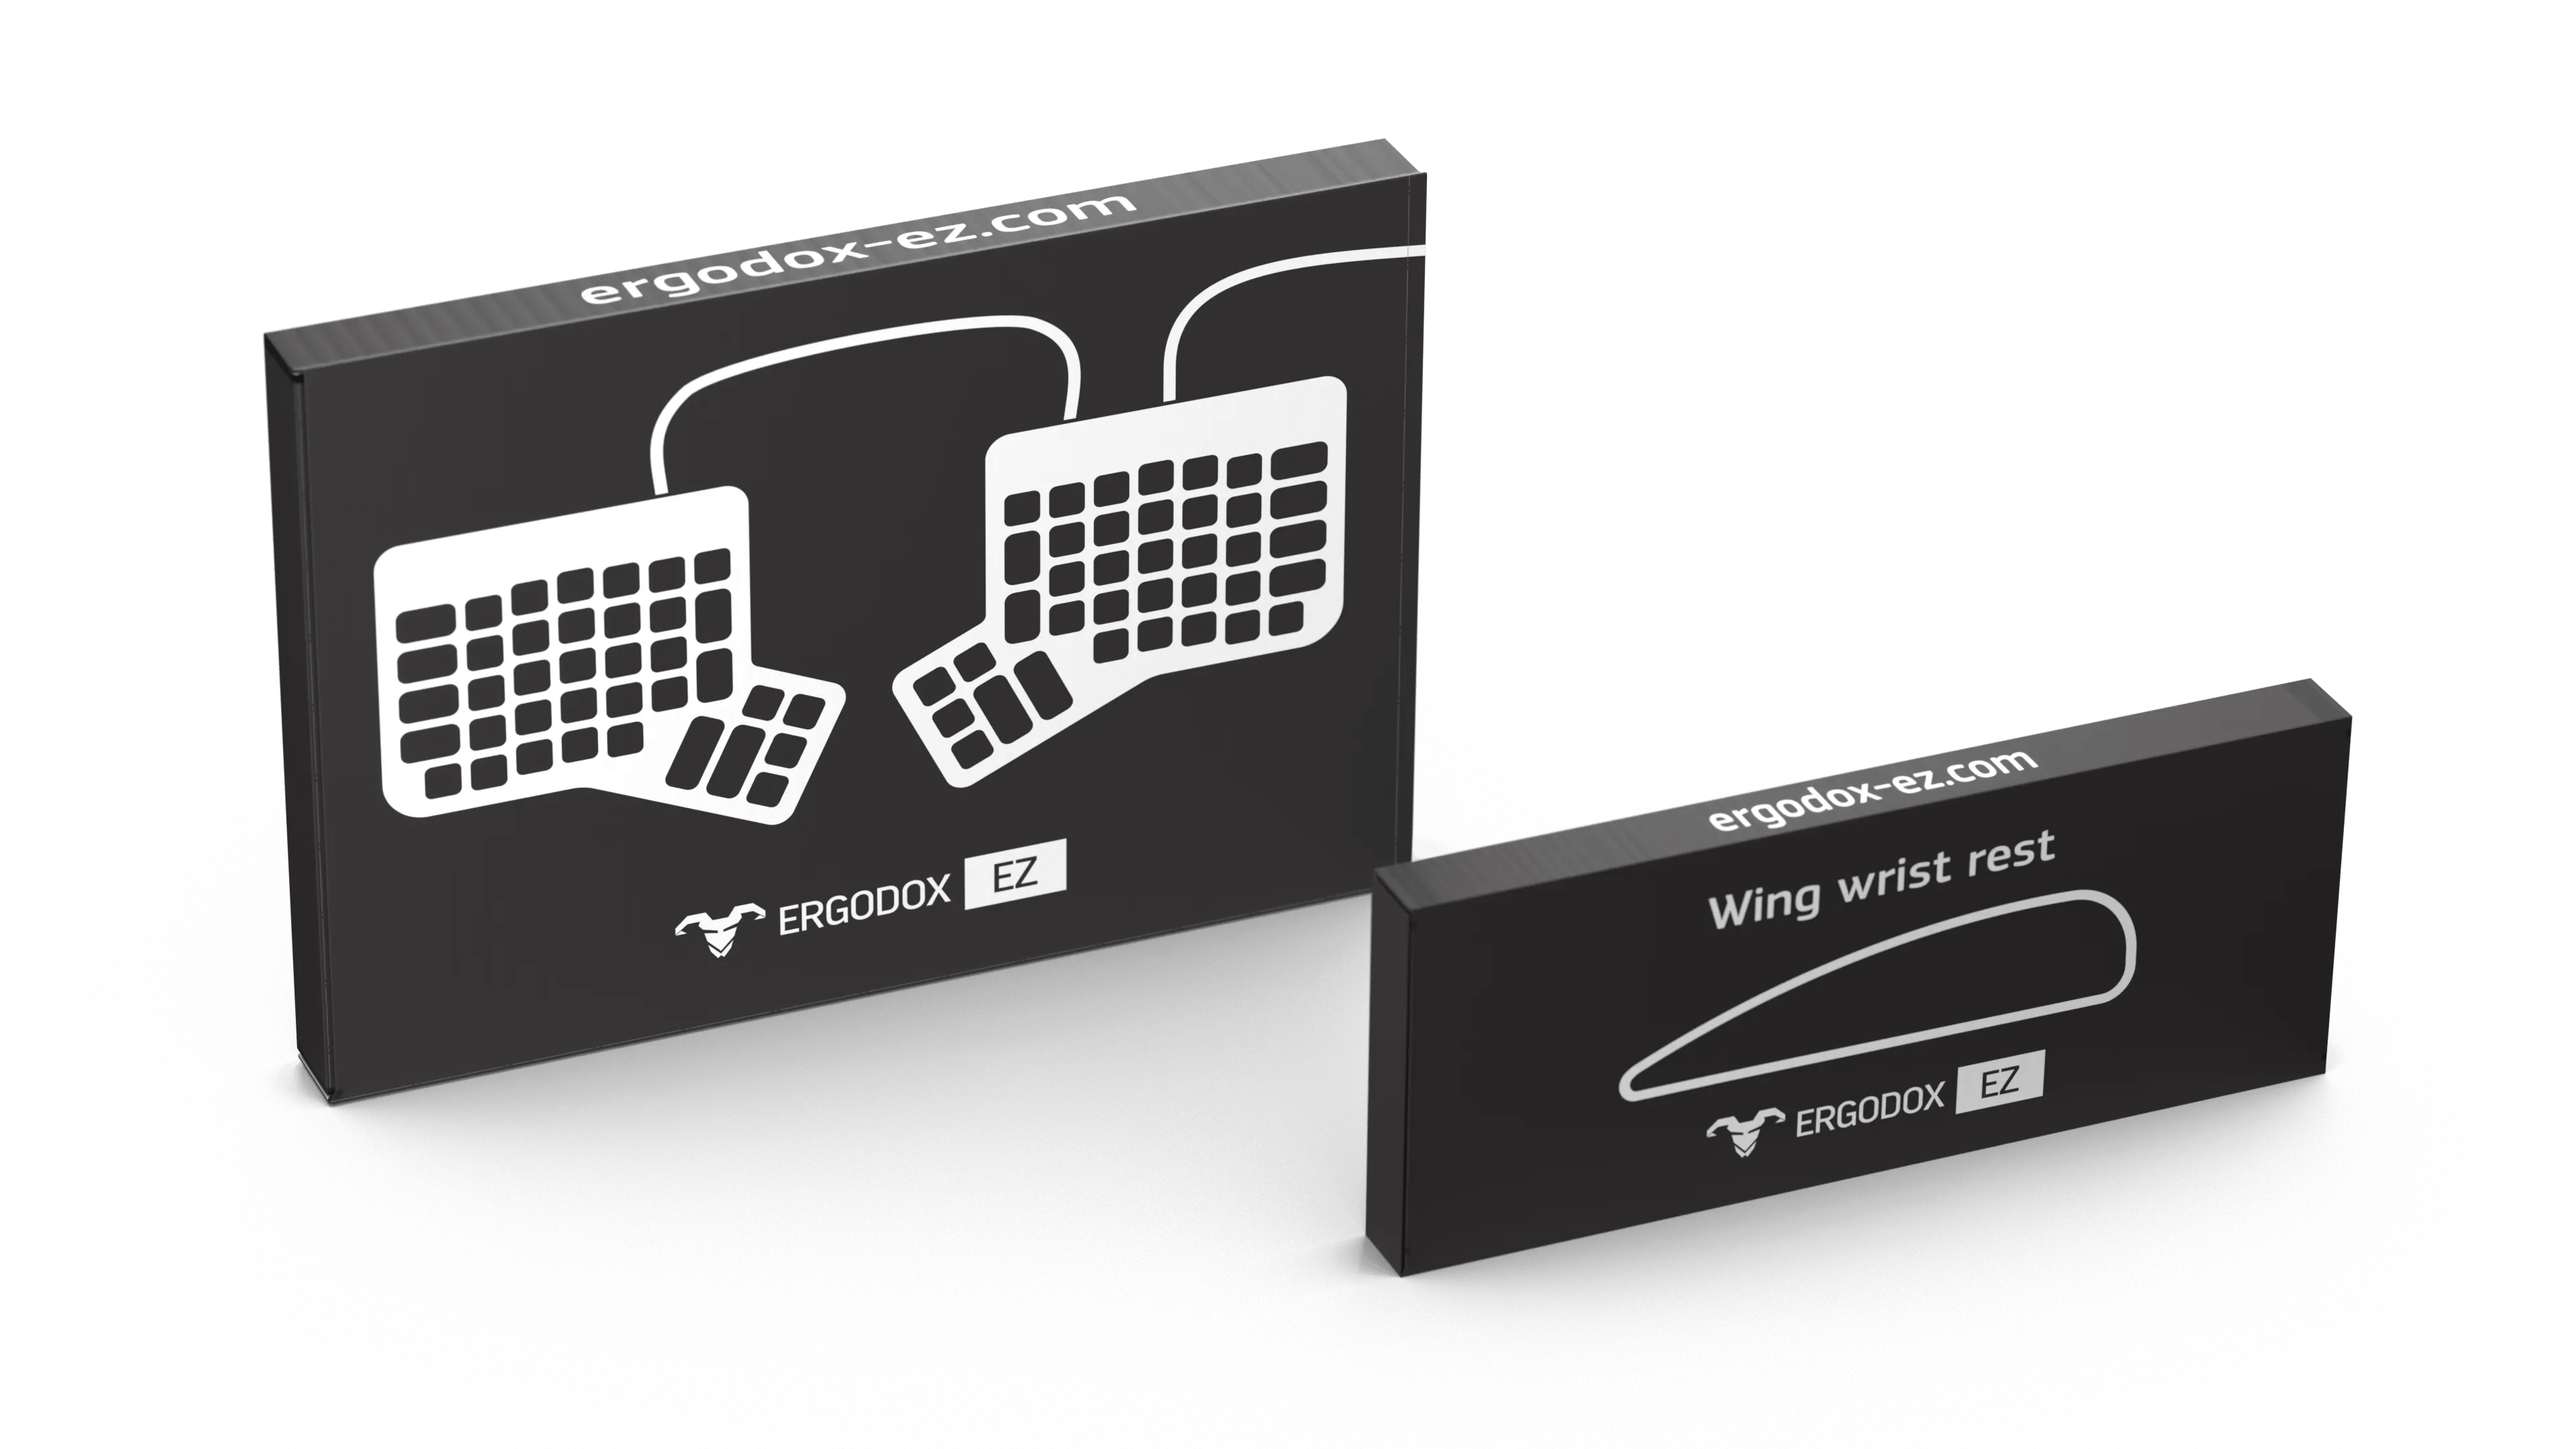
- If you ordered one, the Wing wrist rest comes in its own box.
Connecting the keyboard.
Connecting the keyboard is simple. First, connect both halves using the 3.5mm TRRS cable. Then plug the USB cable into the keyboard’s right half, and connect it to your computer.
When you connect everything up, the three status LEDs on the board should light up in a ripple effect to show that the keyboard is connected.


Operating System Setup
This setup will depend on your operating system. If you’re on Windows or Linux, just plug the keyboard in, and go. On macOS however, there might be a couple of steps to go through.
When you want to connect the keyboard for flashing or training, if you're on Windows or Linux, a little extra setup is required, detailed below.
See Configuring the keyboard type on macOS.


Positioning your Keyboard
It might sound redundant, but we recommend that at this point, you take a good look at the keyboard. Your ErgoDox EZ is a two-piece board. This is something that you need to take advantage of as much as possible.
You want to avoid having the two pieces too close to each other: Don’t replicate what you do with your normal keyboard. Instead, we recommend that you begin by placing the two pieces at shoulder width, ensuring that the home row aligns with your fingers. Your posture should be completely relaxed — just extend your arms naturally at shoulder width, note where your hands fall, and put the keyboard there. Let the board come to you, not the other way around.
Once the keyboard is positioned at the proper distance, place the Wing wrist rests. We recommend that you don’t tilt the keyboard just yet. Instead, put your hands on the keyboard so that your fingers are on the home row and the thumb keys. The Wing does not have to touch the keyboard — we made these elements separate so you can control the distance, depending on the size of your hands. The Wing should be under the root of your wrist, or your palm, and your fingers should be resting naturally on the home row of the keyboard. If that requires an inch of distance between the Wing and the board, that’s absolutely fine.
Note the angle of rotation of both halves relative to your body. They don’t have to be straight — you can angle them outwards slightly, so that your wrist does not have to flex in any direction at all.
At this point, without typing, your position should feel completely relaxed and natural. You’re just laying your hands on the desk in a very comfortable way… and there happens to be a keyboard right under your fingers.
Now that the keyboard’s general position feels comfortable, it’s a good time to play around with the tilt tent kit. Loosen the thumb screw (no tools required), and rotate the legs. You may want to start with the inner two legs, to create a “tent” position. This can be a very moderate angle and it would still make a difference. Once the leg clicks into position, gently tighten the thumb screw again.
This setup is not a one-time thing: Shift your position throughout your day. Feel free to move all four elements (two keyboard halves and two Wing halves) around as you work. Listen to your body, find what feels comfortable for you.
Starting to type
Now that you have your ErgoDox EZ in the right position for you, it’s time to start typing!
Your keyboard comes preloaded with the default layout shown below. If you don’t like it, jump straight into the configurator to make your very own!
See also; configuring the keyboard type on macOS.
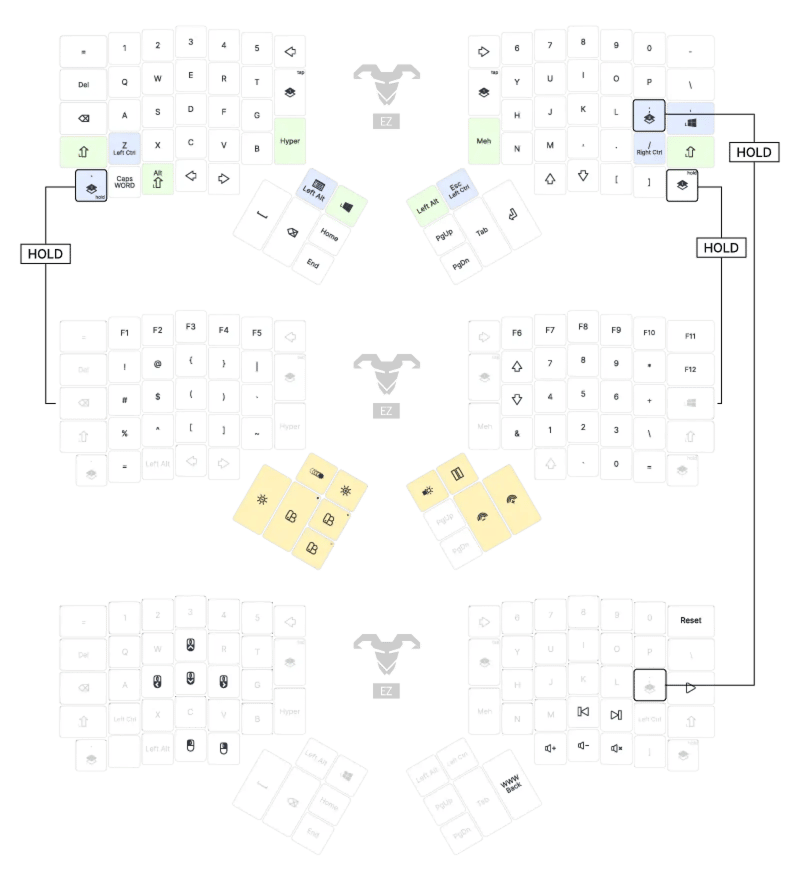 Click here for a printable PDF of the keymap
Note: The secondary functions of keys – what happens when you press a key while holding Shift or Alt/Option – aren’t shown on the layout, but these behave exactly as they do on a regular keyboard, so, for example, pressing ‘Shift’ and ‘1’ will result in a ‘!’.
Master your layout
One of the best ways to get started with your new keyboard is to use the the connect feature in our typing trainer, typ.ing. This feature shows your keymap dynamically on your screen, in real-time, including all layer changes. Here’s how it works:
This is one of the first things you should try with your new keyboard.
Remember: You’re relearning how to type, so it’s going to take some time before you get back to your normal typing speeds. It might be frustrating at first, but with practice, you’ll improve.
If this is your first ortholinear keyboard, you’re going to find yourself discovering some of those bad habits you acquired with your old keyboard. That’s okay, you’ll get there! Just keep on practicing until you’re back to your normal speeds.
Making this a daily habit over the first few weeks will help you tremendously. Ten minutes per day will get you far.
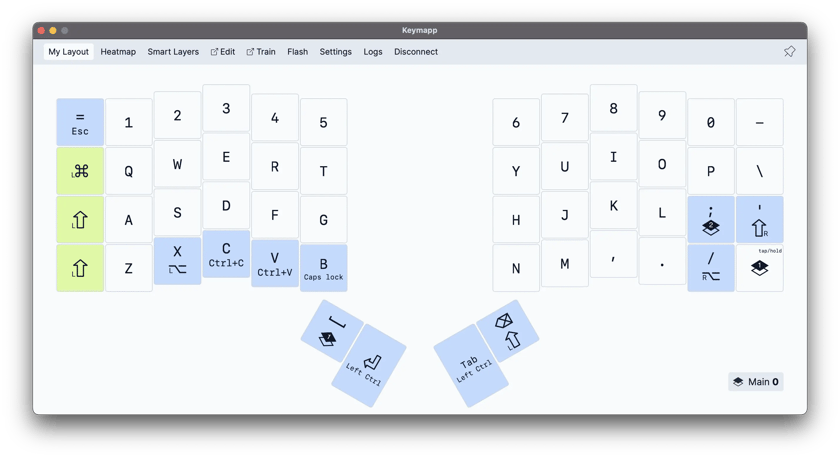
Keymapp
“What does this button do?” — with Keymapp, you never have to wonder.
Keymapp allows you to view your keyboard's layout right on your screen, in real-time. When you switch a layer, Keymapp shows you the keys active on this layer.
Other training options
There are also some third-party typing trainers you could try out:
For regular typing practice, we recommend KeyHero.com. You can select the ErgoDox EZ as your keyboard when you make a profile on the site, and track your progress over time.
Monkeytype is another popular option, with some great color schemes and deep options for customization.
For coding typing practice, we recommend typing.io. It lets you work with real code in several languages, so you get to practice parentheses and curlies, etc.
If you’ve been typing for years, suddenly practicing it may feel awkward at first. It’s all good — deliberate practice is an important thing and it will help you improve rapidly.
Make it pretty, turn on the lights!
If you ordered the ErgoDox EZ Shine or Glow, you can turn on the LED Lighting of your keyboard by pressing the “Lights on” switch located on Layer #1 (if using the default ErgoDox EZ Layout). Here’s a quick GIF:
There are two ways to control the lights on your keyboard: Manually, or automatically per key/layer.
Manual LED control allows you to tweak lighting in the moment, by pressing keys on your keyboard. There are keys to change the current hue and brightness, and flip between all the various animations.
Per-key/per-layer (“smart”) LED control allows you to set colors for certain keys and layers ahead of time. You can use per-key LED control to highlight just the media control keys on layer 2, for example. So every time you flip to layer 2, your media control keys can glow blue, while your mouse control keys can glow green.
Each of these modes has its own toggle, and they have a hierarchy:
Toggle lighting allows you to turn off the manual lighting. Any automatic lighting options you've defined, such as layer colors, will still work even with the manual lighting turned off.
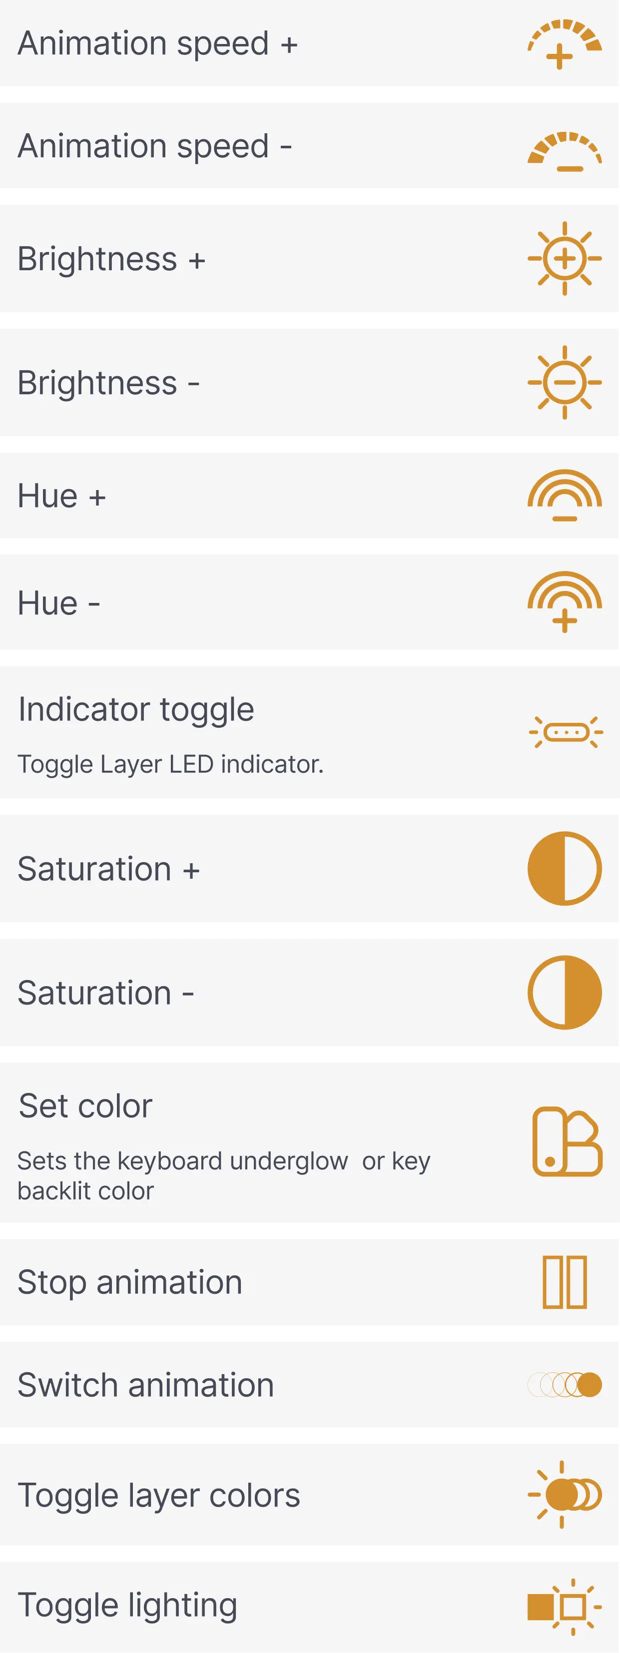
Toggle layer colors allows you to turn off the per-key lighting. This key isn't on the default keymap, you'd have to add it yourself.
With both manual and per-key lighting on, when you switch to a layer that has per-key lighting rules (specific colors you've pre-defined for certain keys or the whole layer), those rules take precedence over any manual settings you've defined in the moment.
In other words, let's say you don't have any predefined per-key colors for layer 0, but you do have some rules for layer 1. So you have a cool animation running on layer 0, and then you switch to layer 1. The animation stops, and the keys you wanted highlighted on layer 1 start glowing in the colors you set.
If you want the animation to keep running even in layer 1, simply hit Toggle layer colors and the automatic lighting rules will be suspended across all of your layers.
More control!
(customizing the firmware)
Your ErgoDox EZ requires no software to work. All the customization is done on your board, at firmware level. This means that nothing you do here will burden your machine, and it’s all cross platform and is portable. Just plug your keyboard into any random computer, and your familiar custom layout is right there, zero installation needed.
The layout that comes pre-loaded on your ErgoDox EZ is not perfect for you — it can’t be, because in ergonomics, one size does not fit all. It’s time to unleash the power of the ErgoDox EZ and truly make it your own.
Before we get started on the firmware side of things, let’s get some terms out of the way.
Firmware Terms
Firmware
Permanent software programmed into a read-only memory.
Software
The programs and other operating information used by a computer.
QMK
Quantum Mechanical Keyboard Firmware. This is the open-source firmware running on the ErgoDox EZ, as well as a number of other keyboards. You can check it out on GitHub.
Configurator
Our custom Graphical Configurator: Oryx, which acts as an easy-to-use frontend to common QMK operations. The configurator generates a C file, and QMK then compiles it into code that can run on your keyboard.
Layer
With QMK, your keyboard has multiple virtual layers. Layer 0 is the base layout, at the bottom of the stack. You can then add any number of layers on top, and redefine one or more keys per layer. So your second layer (layer 1) can have number keys right on your home row, for example. So instead of reaching for far-away keys, you just toggle a layer, and the key you need is right at your fingertips.
Layer toggle types
Momentary (MO):
This is like a Shift key. Hold down a momentary toggle, and you’re taken to another layer. Let go, and you drop back to layer 0.
Toggle (TG):
This is similar to a Caps Lock. Tap once, and you’re moved to that layer. You’ll stay on that layer until you tap the layer toggle key again. Depending on the type, you’ll momentarily/permanently have access to the key bindings of that specific layer.
One-shot (OSL):
Tap this key, and you’re moved to the layer. Tap a single key on the layer, and you will then be sent back to layer 0. Like Shift, but without having to hold down two keys at once.
Tap-Toggle (TT):
A combination of Momentary and Toggle. Hold this key, and the layer is active only as long as you hold it. Tap it briefly, and you’re moved to the destination layer until you tap it again.
Direct switch (TO):
All other layer switches go up (allow you to switch from layer 0 to layer 1, for example). TO is the only one which also allows you to switch down (from layer 3 to layer 2, for example).
Using the graphical configurator
Changing the keyboard layout is easy — at a high level the process is as follows:
- Create a new layout using the online configurator.
- Compile it and download it to your computer.
- Flash it to the keyboard.
Creating a new layout
You can create a new layout by clicking “Modify layout”.
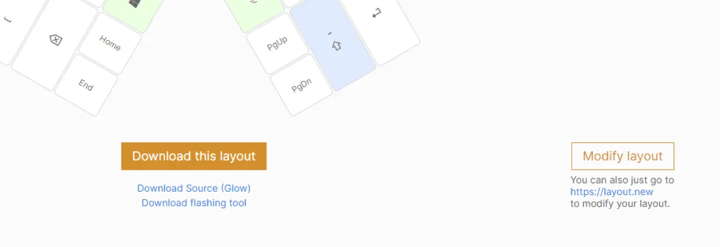
This will take you to a new view where you will be able to add new layers, modify individual keys, and more.
Customizing the layout
After clicking Modify Layout you’ll get a very similar view to the one that you saw before, only now you can actually change things.
Let’s begin by explaining the main elements on the screen:
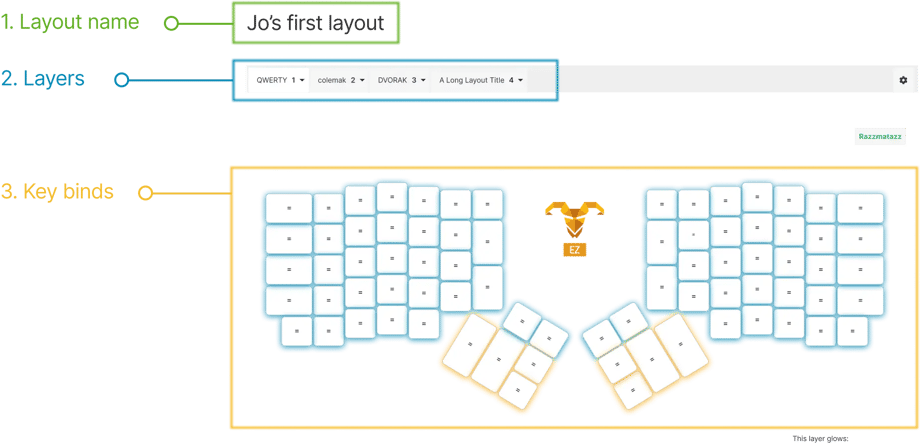
1. Layout Name.
You can specify a name that describes your layout. Our users sometimes append a version to this field, for their own reference, though if you‘re logged in, we will keep track of your layout revisions for you.
2. Layers
Here you can add or remove layers.
3. Key Binds
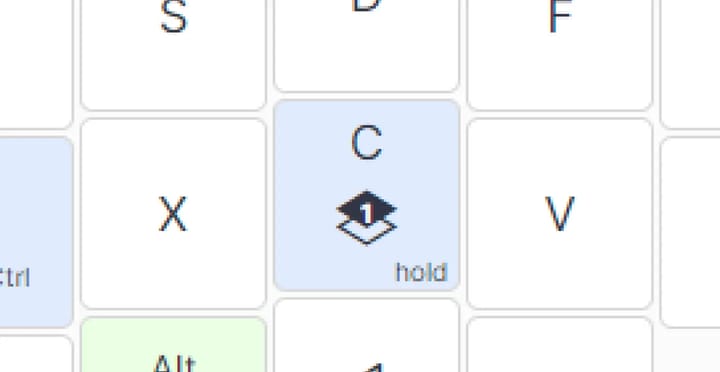
This is where you’ll spend most of your time. You can click any key to modify its function. Let’s go ahead and click C:
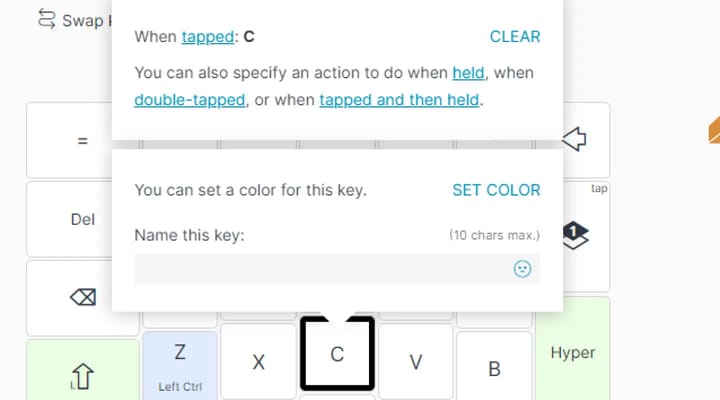
Now, we want to have the “C” key send the “C” keycode if tapped, but momentarily switch layers when it’s being held down.
“When tapped” is already set to “C”, so we click the text that says “when held”.
In the sidebar that opens, we begin by searching for “Layer”. This will show us all the Layer-related functionality.
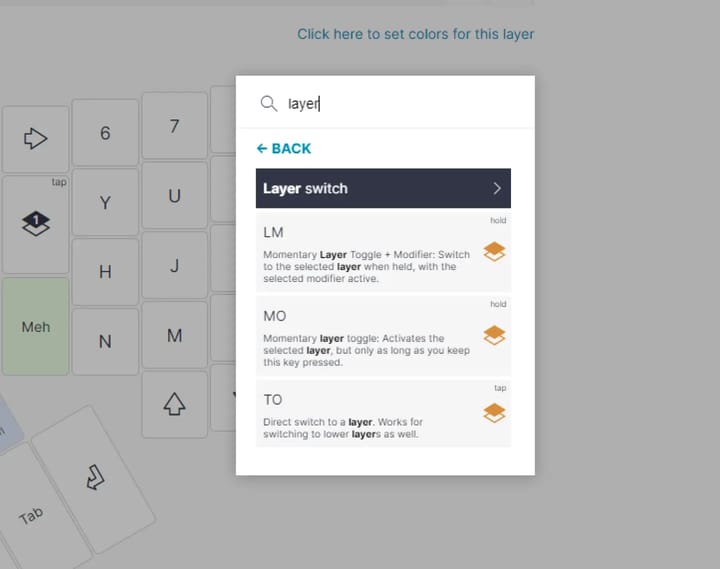
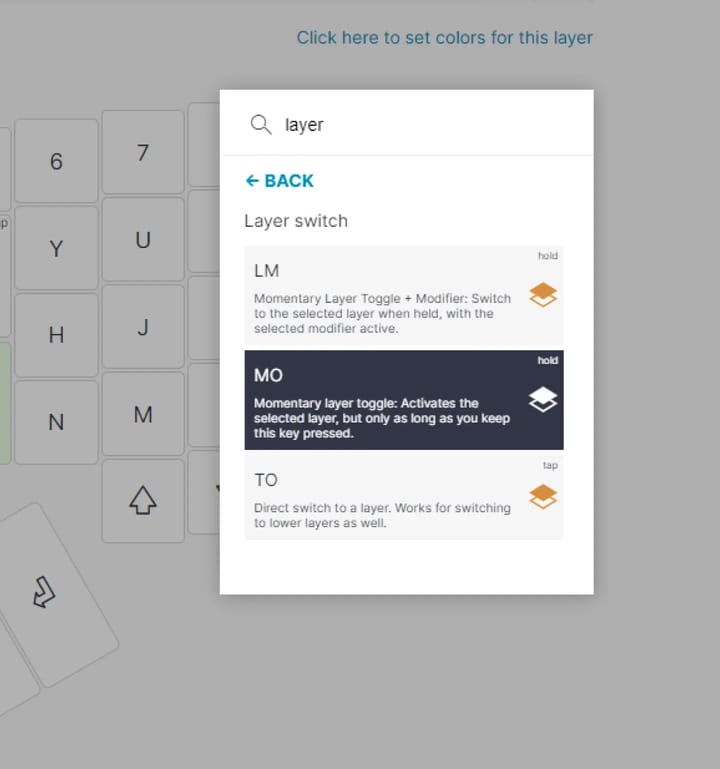
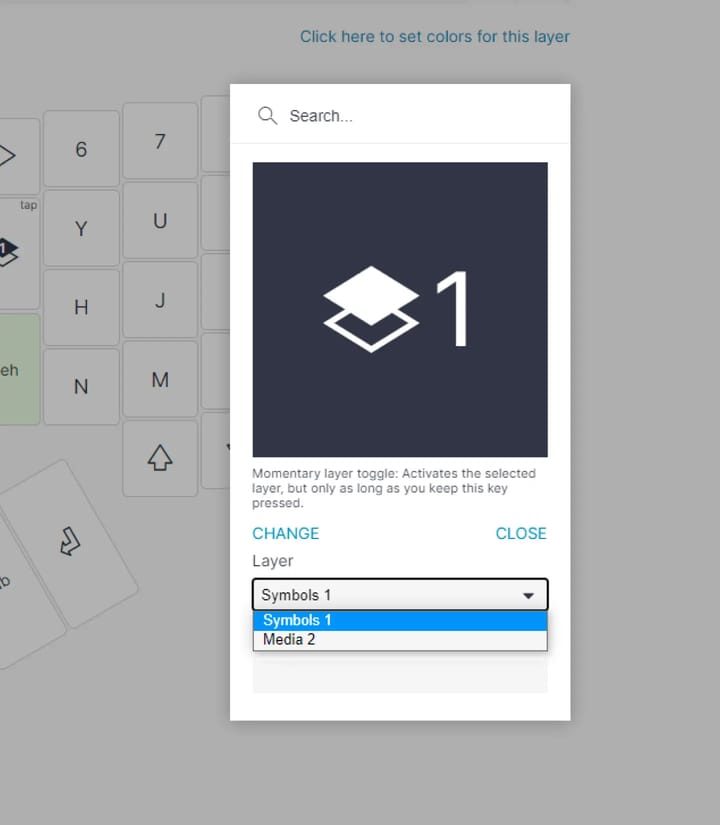
We can see that “MO” is a perfect fit, so we go ahead and select it. Now, we simply specify which layer to go to when held.
After doing this we can click outside of the box. The layout display will update with our new selection:
You can repeat this process as many times as you want to build your own layout. We recommend that you take your time to explore the multiple options that available. Remember: This is a journey keyboard. This won’t be the last time you edit your layout!
Over time, you might want to explore keybinds for double-tapping a key, or a tap followed by a hold. You can have one key do up to four different actions. The real challenge is muscle memory: We suggest not making too many changes at once, so that you’re able to keep track of them as you use the keyboard during your work.
Once you’re happy with your layout, hit the ‘Compile this layout’ button. This will lock your changes and generate a binary file which can be understood by the chip on the keyboard.
There are two ways to save your layout to your keyboard:
With our native app (called Keymapp), or right from Chrome. You can’t use Firefox because of Firefox’s own limitations, not because we don’t like it (we do).
macOS
You can use either Keymapp or Chrome.
Here’s how you do it with Keymapp.
Here’s how you do it with Chrome.
Windows
You must install Keymapp, whether or not you’ll be using it. It comes with a driver that Windows needs.
You can use either Keymapp or Chrome.
Here’s how you do it with Keymapp.
Here’s how you do it with Chrome.
Linux
You must set up udev rules. Here’s how.
You can use either Keymapp or Chrome.
Here’s how you do it with Keymapp.
Here’s how you do it with Chrome.
Customizing in code: Working with the underlying firmware
The firmware running on the Ergodox EZ is the Quantum Mechanical Keyboard Firmware (or QMK, for short), which we actively support. It’s a third-party open-source project running on multiple keyboards, with over 300 contributors and thousands of forks.
If you enjoy working directly with the code driving the keyboard, you can dig right into QMK on GitHub, compile it locally, and customize your keyboard at the deepest levels possible. This is a good starting point— QMK is extensively documented.
More control!
(customizing the hardware)
We are super friendly to modding. It’s in the DNA of the keyboard. We’re all for you modding your board. That said, obviously if you mod it you own it. Take that into account — some of these things will void your warranty, but that’s part of the fun :)
The ErgoDox EZ’s design has no glue or annoying tabs, and we made it easy to open up and mod. But before we get into those advanced customization subjects, let us get started with something that won’t void your warranty.
Changing your keycaps
Pull out the keycaps
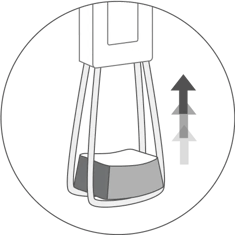
First, you’re going to have to pull out your keycaps. Use the “wire loop” side of the key puller for this.
- Place the puller over the keycap and push down
- The wires will part and “hug” the keycap from below
- Pull directly up, gently but firmly
Changing your keyswitches
This option is only available on the CIY models. If you're unsure of what version you own, please look on the label on the back of the keyboard. Of course, you can always drop us a line and ask!
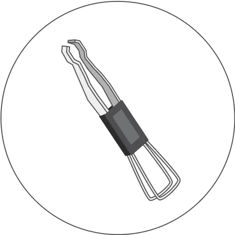
Use the right tool for the job
The EZ comes with a double-sided key puller, designed to make it easy and safe to pull out both keycaps and the keyswitches that lie under them. Before you begin, make sure you have this key puller to hand.
Pull out the keycaps
First, you’re going to have to pull out your keycaps. Use the “wire loop” side of the key puller for this.
- Place the puller over the keycap and push down
- The wires will part and “hug” the keycap from below
- Pull directly up, gently but firmly

Grasping a keyswitch correctly
Now comes the fun part. Here, orientation matters: Insert the tweezers under the switch where you see the little tabs.
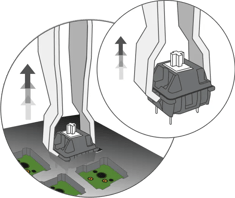
Pulling it out
Squeeze the tweezers around the switch and pull up with a smooth upward motion. The keyswitch will come out - victory!
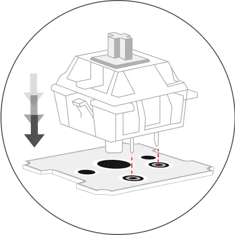
Inserting a new switch
Once you have your switch out, you’ll see the socket. Before you insert the new switch in, make sure its pins are straight and that it’s correctly oriented. Then, simply push straight down, and the switch will click into place.

You’ve got it!
Repeat for as many keys as you'd like. Then, bask in the satisfaction of a job well done: You just did something very few mechanical keyboard owners can do.
Warranty!
We understand that ErgoDox EZ is a serious investment in your future well being, and our warranty reflects this. From the moment your keyboard arrives at your doorstep your keyboard is covered.
Please note that your warranty is non transferrable. Our keyboards are not marked with serial numbers — we use your original proof of purchase. If you didn’t buy a keyboard directly from us, it is unfortunately not covered by our warranty.
What is covered by our warranty?
Basically, any reasonable use. If a keyswitch starts chattering, we’ve got your back. If the board stops working one day without you having done anything to it. It’s a two-year warranty, and we really care, so just email us. The warranty is non-transferrable though, and applies to the original buyer of the keyboard.
What is not covered?
Any damage that is caused by accident, abuse, misuse, liquid contact, fire or environmental causes. Don’t spill coffee on your keyboard; it doesn’t need it.
Still have a question?
Robin, Nick, Mike, and Erez are here to personally help you. Please email us and we'll get back to you promptly — it is important for us that you have a great experience with your Ergodox-EZ. ❤️
[email protected]